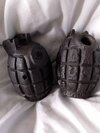
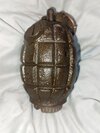
I thought I'd share a few pictures of my first attempt at giving two No.36 bodies a Manganese Phosphate coating. I obtained a few semi relic grenades and thought I'd strip them right back to bare metal and Parkerize at home. Various recipes can be found online, but they all seemed to follow the same principle. The materials were easy to obtain and fairly cheap. The Phosphoric Acid was sourced from an online brewing supplies store. The grenades were soda/grit blasted prior to coating. This didn't work out as planned, leaving the metal like a Lunar landscape. The results pictured are after around 20 minutes in the hot solution, followed by immersion in boiling water then oiled. I admit I was very surprised at the finished coating. Anyway, I hope that you find them of interest.
British Ordnance Collectors Network
You are using an out of date browser. It may not display this or other websites correctly.
You should upgrade or use an alternative browser.
You should upgrade or use an alternative browser.
Manganese Phosphate coating for Mills Bombs.
- Thread starter adammack
- Start date

Have you considered coating with a brown shellac? I read the 36M was done that way. I don't know if that was commonly done during WW2.
Have you considered coating with a brown shellac? I read the 36M was done that way. I don't know if that was commonly done during WW2.
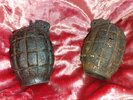
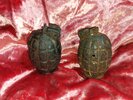
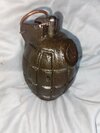
After removing from solution and oiling (while hot), I applied a coat of Button Polish. This is as close as I could get to Shellac. It forms an amber brown colour and looks (to me anyway) very close to the original finish.
Attachments
Looks good. I have not heard of Button Polish but I looked it up and see it is a shellac-based product used in woodworking. Supposed to impart a warm finish. What brand did you use? I see a brand available in the U.S. called Fiddes.After removing from solution and oiling (while hot), I applied a coat of Button Polish. This is as close as I could get to Shellac. It forms an amber brown colour and looks (to me anyway) very close to the original finish.
Thanks. The brand I used was "Morrells'. I just used a 10ml sample bottle from eBay for around £3. It's actually quite thin and watery, so a little goes a long way. I remembered the qualities of Button Polish for use on this project, as we had quite a lot of it at home growing up. My Grandmother was a French Polisher on RMS Queen Mary, who later taught my Father the skills.Looks good. I have not heard of Button Polish but I looked it up and see it is a shellac-based product used in woodworking. Supposed to impart a warm finish. What brand did you use? I see a brand available in the U.S. called Fiddes.
When the grenades came out of the casting moulds they went through a few processes like threading and fettling with a file or linishing wheel to take the casting flashing of the cast, then the shellac similar to button polish was applied to the body. The reason they done this is it dried much faster, using varnishes took longer to dry. I think they went into a oven and they were sprayed rather than dipped with a dark shellac. Phospating is a good way to preserve items, just after you have done the process you can dunk in oil or paint. It was originally used in the painting industry and 100% better than any primer, If you want a authentic grenade finish you dont phosphate the body before shellacking, should be similar as a cast piece not sandblasted, Spraying involves about 4 or even 5 good coats.
I assume you mean furniture polisher. Probably a lot of that wood is still present on her. Readers might be interested to know she has been in Long Beach, California since retirement. Lots of internal changes to turn the ship into a hotel with retail stores and restaurants. She is aging and costly to maintain but last year she turned a nice profit. The RMS Queen Mary and RMS Queen Elizabeth were troop ships during the war running from the U.S. to U.K. Queen Mary set a record of nearly 17,000 soldiers and crew on one voyage. Most people aboard a ship. They often ran alone without escort destroyers because with a top speed of 60.8 km/hour (37.8 miles/hour) they outran U-Boats as well as destroyers!Thanks. The brand I used was "Morrells'. I just used a 10ml sample bottle from eBay for around £3. It's actually quite thin and watery, so a little goes a long way. I remembered the qualities of Button Polish for use on this project, as we had quite a lot of it at home growing up. My Grandmother was a French Polisher on RMS Queen Mary, who later taught my Father the skills.
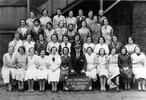
My Grandmother, third from the right, front row, was part of the team employed in "The Finishing". She was a skilled French Polisher and carried her skills on to cabinet finishing between 1950-74.I assume you mean furniture polisher. Probably a lot of that wood is still present on her. Readers might be interested to know she has been in Long Beach, California since retirement. Lots of internal changes to turn the ship into a hotel with retail stores and restaurants. She is aging and costly to maintain but last year she turned a nice profit. The RMS Queen Mary and RMS Queen Elizabeth were troop ships during the war running from the U.S. to U.K. Queen Mary set a record of nearly 17,000 soldiers and crew on one voyage. Most people aboard a ship. They often ran alone without escort destroyers because with a top speed of 60.8 km/hour (37.8 miles/hour) they outran U-Boats as well as destroyers!