What's new
British Ordnance Collectors Network

This is a sample guest message. Register a free account today to become a member! Once signed in, you'll be able to participate on this site by adding your own topics and posts, as well as connect with other members through your own private inbox!

What a Type Of Shelves For Fuze Collection?

Darren

Well-Known Member
I am looking for ideas for types of shelves to display my fuze collection, at the moment they are all crammed on a bookcase with fuzes 5 rows deep but I am wanting shallow wall mounted shelves. I would be interested in seeing pictures of how other members display thier fuzes to give me some ideas.
 
In 1988 I started a separate building for my Ordnance collection. On 911 they let us go home from work early and I put the roof on the first expansion room about 36 feet X 12 feet. All of the shelves in my collection lean back towards a wall or the back of another shelf. Most of the fuze collection is on shelves made of 4 ft X 8 ft sheets of plywood turned on their sides with 2 X 4s lag screwed to them for shelves that are 3-1/2 inches deep. The top surface/shelf is a 2 X 10 making a 9inch plus deep shelf, and the bottom most shelf is comprised of two 2 X 4s, making a shelf about 7 inches deep. The shelves are spaced at different distances from each other, the larger differences for longer/taller fuzes and smaller distances for short fuzes. Really long fuze extenders and bomb fuze propellers are placed horizontally on the bottom shelf at present. The area is a kind of catch all right now, with projectiles and rounds intermixed with the fuzes. I plan to add 2 X 4's to the shelf shown in the photo named south2, to accommodate all of the German fuzes which are still in plastic boxes on the floor. That will give me 160 square feet of fuze shelf facing. I'm redesigning an area above the shelves for the large U.S. Prox Bomb fuzes. I will be cutting holes through a piece of aluminum channel, for the threaded portion to fit down into. I also plan to build some small block with holes in them to place the French Beehive fuzes in, to keep them standing. Right now they are just leaned up against the back of the shelf.
 

Attachments

  • straight.jpg
    straight.jpg
    300 KB · Views: 104
  • Right.jpg
    Right.jpg
    288.7 KB · Views: 94
  • Prox .jpg
    Prox .jpg
    306.2 KB · Views: 93
  • North.jpg
    North.jpg
    290.1 KB · Views: 96
  • South.jpg
    South.jpg
    289.1 KB · Views: 95
  • South 2.jpg
    South 2.jpg
    294.4 KB · Views: 87
Last edited:
Lovely display Hazord I do like your blue room. Thanks for the pictures.
Darren my only advice is make sure your display is future proof i.e. don't just make it big enough to display your current fuze collection as I'm sure that will grow.
Dave.
 
Yes, exactly what Dave said. I no more than put the finishing touches on the room, when I obtained 200 or more fuzes. That's why I have to add the shelves and go above the shelves onto the wall for the bomb fuzes.
 
Yes, exactly what Dave said. I no more than put the finishing touches on the room, when I obtained 200 or more fuzes. That's why I have to add the shelves and go above the shelves onto the wall for the bomb fuzes.

Thanks for the pictures Hazord, great collection. Unfortunately I don't have too much space but will defiantly be using as much shelving as I can.
 
Something I did a long time ago, was to build a cabinet. There was a shelf in back, and there were shelves on the doors, so when you opened the doors, you had double the shelves displayed, because it was twice as wide withe the doors open all the way.

You could also make multiple shelves, one behind the front one, and one behind the second one, etc. each shelf has a hinge on the end that let's it swing out, as long as the one in front of it has swung out of its way. You could have them alternate side to side if you want


Sent from my NSA/FBI tapped iPhone using Tapatalk
 
great monument to much time(not to mention cash!) in chasing down the prey .Thanks for sharing. the Otter.
 
Hazord, Absolutely breathtaking. Thank you for sharing both the collection and the neat shelving ideas. Pat
 
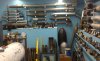
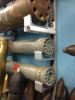
Pat, thanks! You are welcome. Actually what shows in the photos is only about half of the separate fuzes. In addition, all of my other ordnance is fuzed, artillery, mortars, bombs, etc.

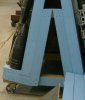
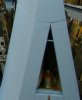
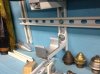
Since you have mentioned the shelving ideas, I thought I would share the basic design. I came up with the design years ago, around 1989. In 2009 I had a large expansion and built 6 of the center-room racks on wheels. I already had 4 built from the initial construction. I took photos of the units after construction and painting, but before they were loaded. In the photo named structure, you can see 5 new 8 foot sections on the left and one in the foreground on the right. In the photo named structure base, you can see the basis for all the shelving. It is the W shaped piece (with the outer sides of the W almost horizontal) in the bottom middle of each rack. I built a fixture to manufacture these, by laying 2 X 4's in the frame and nailing them together with a pneumatic nailer. It takes 3 of these bases for each 8 foot section, one at each end and one in the middle. The outer legs of the W are long enough to hold 3 2 X 4's and a 1/2 inch thick piece of plywood. You can see that in the left o the same photo. These base sections are also used as the base of the fuze shelves and the base of the shelves that are standing on end leaning against the walls around the walls of the room. Since the wall shelves only have one side, they only need half of a W shaped base, so I cut the base down the middle and add a vertical board to each half where the cuts are made.

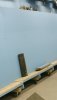
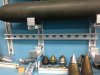
The design has evolved over the years as I have tried to make improvements. On this build, I added strips of Unistrut every 4 linear feet, to allow the shelf height to be adjusted for taller or shorter rounds or cases. You can see the Unistrut channel on these shelves in the photo named Unistrut, and attached to the building walls holding up the rockets. The rockets rest in a piece of steel channel attached to the Unistrut. Being able to adjust the supports up and down allowed me to organize the rockets and level them with a digital level.

The center room shelves are made from two 4 X 8 sheets of 1/2 inch plywood nailed to a 2 X 4 frame. They are mounted to 3 bases back-to-back so they touch at the top. The panels are attached to the frame with long sheetrock screws. I then split a sheet of plywood down the middle and made the V shaped top that is bolted down to the top of the previously described structure. This gives me two shelf backs that are 6 ft. by 8 ft. that lean back into each other. With this structure complete, I attach 6 steel casters to each center room rack, and then calk and paint the assembly. When that is done I attach the Unistrut with lag screws.

On the racks that have ends exposed to the aisles, I build internal shelves, one on the bottom, and one on top of the W. I use these little areas to store extras of items and components.

I can move a completely loaded rack with a long crowbar, wheeling it slowly on the concrete floor. I have to remove the end rounds off each shelf as they tend to fall off.
 

Attachments

  • Structure.jpg
    Structure.jpg
    294.6 KB · Views: 42
  • Structure base.jpg
    Structure base.jpg
    129.4 KB · Views: 40
  • Wheels.jpg
    Wheels.jpg
    45.1 KB · Views: 36
  • Wall leaning.jpg
    Wall leaning.jpg
    113 KB · Views: 35
  • Unistrut.jpg
    Unistrut.jpg
    163.5 KB · Views: 37
  • Unistrut support.jpg
    Unistrut support.jpg
    186.1 KB · Views: 38
  • unistrut support 2.jpg
    unistrut support 2.jpg
    164.4 KB · Views: 37
  • Internal storage.jpg
    Internal storage.jpg
    234.1 KB · Views: 30
Last edited:
Hazord,

An outstanding system. By making the racks mobile, you are able to accommodate future additions such as a V-1, V-2, and Japanese BAKA bomb; as it would appear these are the only 3 things missing from your collection!

The use of Unistrut is brilliant but how are the horizontal pieces attached to the vertical? Are they special pieces from Unistrut of something you made?

Thanks again for sharing these well thought out ideas for us. Pat
 
The horizontal strips you see on the barrage rocket section are Unistrut just bolted to the verticals. Then, there is an additional vertical piece because I needed one there for the rockets that were too short to make it to the next wall stud. I'll take a photo of the joint. I didn't mention it, but I got all the Unistrut and hardware for 15 cents a pound at the local scrap yard.

I have a fuze for a V1.

I shot some photos with my phone. The cross supports are bolted to the two original verticals, then a new vertical is added in the middle and is bolted to the two horizontals. The bracket is shown that supports the rocket. A piece o Unistrut is attached to the vertical, and then a 1-1/2 inch piece of steel channel painted silver is bolted to the Unistrut. The channel can be moved out far enough away from the wall, so that the fins can be opened, if there are fins. The edges of the channel that touch the rocket are covered with a piece of split Teflon tubing to prevent damage to the paint on the rocket. I use 3/8 inch bolts to connect the Unistrut to Unistrut, because a socket to hold them will fit into the groove of the Unistrut. I use 1/2 inch bolts for maximum strength where the shelf piece attaches to the Unistrut up the wall.

Different size brackets are shown for different size rockets. For the smallest rockets I use short piece of small Unistrut. All of the Unistrut was painted by the previous owner to be used in a computer chip clean room.
 

Attachments

  • image.jpg
    image.jpg
    282.5 KB · Views: 26
  • image.jpg
    image.jpg
    281.6 KB · Views: 27
  • image.jpg
    image.jpg
    292.5 KB · Views: 27
  • 57mm supports.jpg
    57mm supports.jpg
    279 KB · Views: 26
  • Larger Supports.jpg
    Larger Supports.jpg
    276.3 KB · Views: 26
Last edited:
Thanks for the pictures Hazord, great collection. Unfortunately I don't have too much space but will defiantly be using as much shelving as I can.
Hi Darren,
making the most of space while keeping a display looking good is always a challenge,
I have found that if you make your shelves like steps, each layer behinde a step higher, and position each item in front of the gap
between the neighbouring items behinde, everything is visible and neat, a bit like the way seats are set out in a cinema or theatre etc.
Cheers Tim.
 
Hazord,

15 cents a pound? I wish there was a scrap yard like that around here. I really like the "L" brackets and the steel channel. Great ingenuity!

Thanks again for the pictures and information.

To Darren,

Thank you for starting this thread as some very usefull information and ideas have come forward and the very best of luck with your display!

Pat
 
We have a huge computer chip manufacturing company here, that was renovating a clean room. I got all the Unistrut, brackets, bolts, accessories etc. for scrap price. It would arrive at the scrap yard in the large dumpsters and I would pick out whatever I wanted. I took my cordless impact wrench to break all structures down into components, all bolts and small brackets going into 5 gallon buckets. It took multiple trips over multiple weeks to round up all the pieces/parts and channel. I took all the small channel and some large channel.
 
Top